- Published on
Getting Netlify CMS Working with Gatsby and Gitlab
- Authors
- Name
- Yair Mark
- @yairmark


As discussed in one of my earlier posts, I host this blog on Netlify which is a serverless hosting provider (among other things). In my case I use it to host statically generated files that are built using the GatsbyJS framework. One of the things I wanted -that was not available in the default blog starter- was some sort of CMS similar to what you get with Ghost.
I found Netlify CMS which does exactly that. It requires a bit of setup, but I followed most of what is outlined in the GatsbyJS Netlify CMS blog. The main things I had to tweak to get this to work with Gitlab are below.
Netlify CMS config.yml file
The below is basically what my config looks like:
backend:
  name: gitlab
  repo: yourGitLabUsername/gitlabProjectWithGatsbyFilesIn
  commit_messages:
    create: Create {{collection}} "{{slug}}"
    update: Update {{collection}} "{{slug}}"
    delete: Delete {{collection}} "{{slug}}"
    uploadMedia: Upload "{{path}}"
    deleteMedia: Delete "{{path}}"

media_folder: static/assets
public_folder: ../static/assets

collections:
  - name: blog
    label: Blog
    folder: blog
    create: true
    extension: 'md'
    slug: '{{day}}-{{month}}-{{year}}-{{slug}}'
    fields:
      - { name: title, label: Title }
      - { name: date, label: Date, widget: date }
      - { label: 'Tags', name: 'tags', widget: 'list' }
      - { label: 'Publish', name: 'publish', widget: 'boolean', default: true }
      - { label: 'Table of Contents', name: 'toc', widget: 'boolean', default: false }
      - { name: body, label: Body, widget: markdown }
- Change the
repoto the last part of the repo URL on Gitlab where you host your your Gatsby blog.- The easiest way to find this is to click the link to your repo. You will end up on a webpage that is the root of your repo. The last part of the URL will be
yourUsername/repoName.
- The easiest way to find this is to click the link to your repo. You will end up on a webpage that is the root of your repo. The last part of the URL will be
commit_messages: are the commit message template that will be used by Netlify CMS when committing on your behalf for different types of changes.media_folder: I moved all my images under to this path where thestaticfolder is in the root of my repo.public_folder: This is the path that Netlify CMS will prepend to all static assets. For example if you include an image.folder: blog: This is the folder that holds your blog posts in. In my case I moved all my blog markdown files into this folder as the default GatsbyJS blog starter does not use this structure (update yourgatsby-config.jsaccordingly).create: true: this has to be true if you want to be able to add new blog posts to what is called a collection.- A collection is a grouping of blog posts in the configured folder.
- In the above I only have one collection called blog.
- It would make sense to make this config false if you wanted a collection that will not change for example if you had documentation for older versions of your API for a library you have.
extension: refers to the extension used by files in the collection.- Netlify CMS can infer this but better to be explicit.
slug: You can define a pattern here for how file names will be created and generated by Netlify CMS.- See here for more details.
fields: contain the fields you use in your front matter in each blog entry. This will differ based on how your front matter is structured.- The most import field you will need is the
bodyone which uses themarkdownwidget. This widget is the WSYWIG/Markdown editor you use to create your posts. - You can find out more about what Netlify CMS widgets there are over here.
- The most import field you will need is the
Setting up on Gitlab and Netlify
At this point if you ran the Netlify CMS you would see a button to login using Gitlab. But clicking it will result in a new window popping up with the following error:
Make sure you've configured the API credentials for Gitlab from the Access part of your Netlify site dashboard.
To resolve this error follow the steps in the next sections.
Gitlab
In Gitlab you will need to:
- Go to Settings > Applications.
- Choose any name that makes sense like
YourBlogName - Netlify CMS. - For the redirect URL use:
https://api.netlify.com/auth/done - Push
Save Application. - You should then see a page with the app id and secret id which you will need to keep for your Netlify setup.
Netlify
Follow the rest of the steps described here using the Gitlab app id and secret from the previous step (wherever it says GitHub replace it with Gitlab):
- Go to your Netlify dashboard and click on your project.
- Navigate to Settings > Access control > OAuth.
- Under Authentication Providers, click Install Provider.
- Select GitHub and enter the Client ID and Client Secret, then save.
Accessing the CMS
- Ensure the changes you made in the previous step have been deployed to Gitlab.
- You can also test this locally by running
gatsby developthen going to http://localhost:8080/admin/
- You can also test this locally by running
- Go to <yourSitesAddress>/admin/
- It is important you use the trailing
/in admin otherwise this will not work.
- It is important you use the trailing
Final Result
CMS Login Page
If you have setup your Netlify CMS config file correctly (as described earlier) when you hit /admin/ you should see a login screen like below:

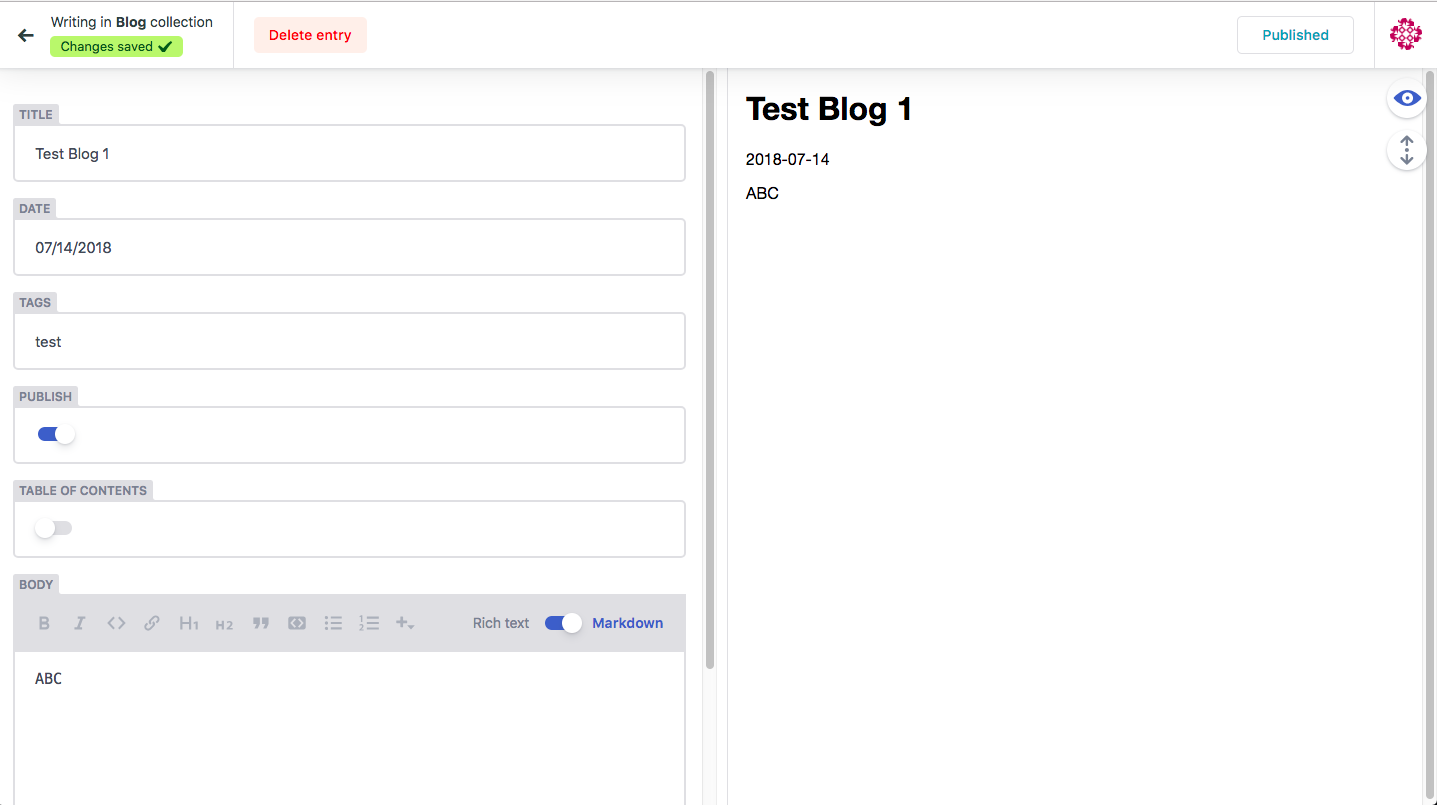
CMS Editor GUI
Below is an example of what the Netlify CMS looks like using the collection setup in the above yaml:

Example Generated File
When you publish something new using the Netlify CMS:
- A file is created in the
/blogfolder called14-07-2018-test-blog-1.md - This file has the following contents in:
---
title: Test Blog 1
date: '2018-07-14'
tags:
  - test
draft: false
category: 'Tech'
description: ''
template: 'post'
toc: false
---

ABC